Cheese & Chive Chickpea protein bread


After my Chickpea cakes were a success I wondered if I could turn the idea into a Chickpea bread. I googled but couldn’t really find anything. Most Chickpea bread recipes used just Chickpea flour or had more chunky pieces of chickpeas in them like a veggie roast. I wanted to try for something I could slice and use for sandwiches or toasted like you would do any bread. Protein bread is something I’ve failed at miserably many times in the past. I wasn’t expecting it to be a success as I’ve had so many fails that have gone in the bin. When I tapped the recipe into MyFitnessPal I was shocked at the macros. 73 calories, 4.8g carb and 11.3g protein per slice. That can’t be right?!?!?! I double checked everything and it was!

So I literally just adapted my cake recipe to make it savoury to play it safe. Instead of the banana I added sweet potato. Sweetener was replaced with salt, vanilla extract was swapped for garlic and coconut flour swapped for gram (Chickpea) flour. You could stick to using the coconut flour but I didn’t want to add a coconut taste to it. Wheat flour or ground almonds would also work (but obviously the macros would be different). I added Parmesan for a strong cheese taste and 100g of protein cheese because that’s all I had left on the block! I had planned to add more but I’m glad I didn’t. The cheese flavour is bang on. This recipe isn’t technically bread, it’s more of a “savoury cake” that tastes just like bread and can be used as a bread substitute with better macros. If I make it again I would add some sundried tomatoes and olives. Maybe a rosemary version too (I love rosemary!)

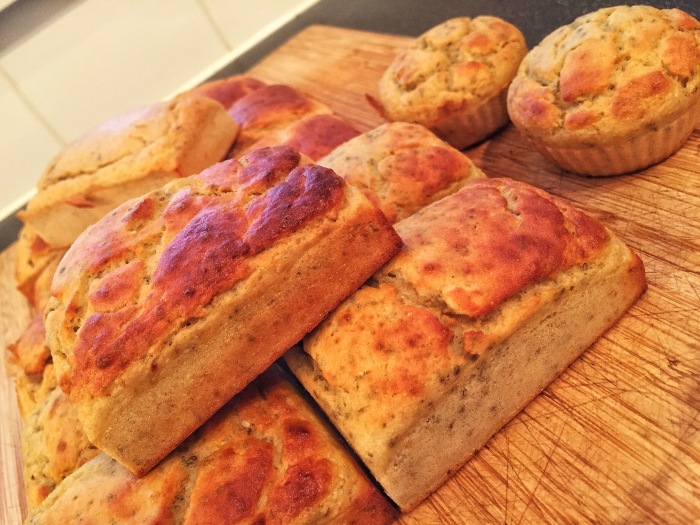
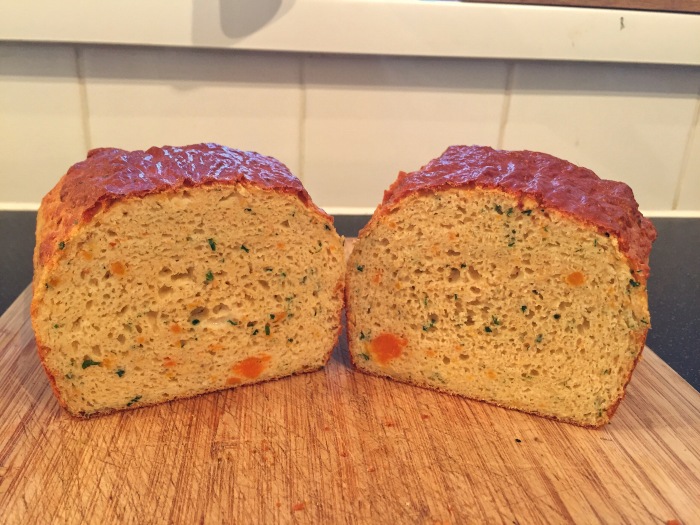
I added the mix to a loaf tin with a liner, and also filled two silicone muffin cases with a little of the mixture and baked them at the same time so that I could have a taste to check if my experiment worked. I baked the muffins for just 15 mins at 140C (280F) and they were done. I sliced them in half and added a little butter. I had my fingers tightly crossed that they would taste ok. OMG! On the first bite my thought was “cheese scone”. It could totally pass for one. I had high hopes for my loaf. I removed it from the oven after 30 minutes. A skewer came out clean but when I cut it it was still slightly underdone in the middle. I popped it back in for a bit and decided that for a loaf the right cooking time would be 35-40 minutes.

img_4995
Ready for the oven

The bread was quite moist when I took it out of the oven. I thought it was a little too moist, however, as the slices cooled they dried out and improved. The top was crusty like a fresh loaf. It sliced perfectly and I think with a bit of precision you could even get 20-22 slices off of it.

img_4997
Cheesy, crusty top

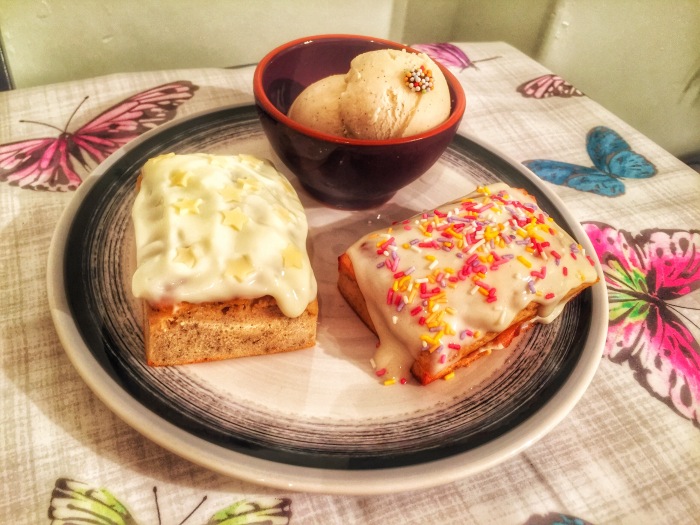
The taste test of the slices passed with flying colours. I can’t tell you how long I’ve been trying to create protein cakes and breads that aren’t a wet or rubbery shambles. Beans and pulses are definitely the key! I also tried a slice toasted and buttered. That took it to another level. The top crisped up even more and it tasted divine.

img_5001
Sliced in half

To put the bread to scale, my slices weighed about 40-50g so they are half the size of a standard loaf of sliced bread. If you’ve ever tried Paul Rankin’s Irish soda bread (delicious!) the slices are about the same size as that.

img_5004
Perfect slices

Cheese & Chive Chickpea protein bread Recipe

Serves: 18 slices

Ingredients:
1 tin chickpeas, drained and rinsed
75g cooked, mashed sweet potato
100g Eat Lean protein cheese
10g Dried, grated Parmesan
75g Quark (or 0% Greek yogurt, or cottage cheese)
50g gram (Chickpea) flour (or coconut flour or ground almonds or plain flour)
Salt to taste, not too much as the Parmesan and cheese are salty. I added 1tsp.
4 medium egg whites
40g egg white powder + 60ml water (I used MyProtein. If you don’t have this add an extra 4 egg whites. I find that the egg white protein helps give bakes a more solid shape and stops them deflating)
A big bunch of chives, finely chopped
2 garlic cloves, mashed (optional)
1 tsp garlic granules or garlic salt (optional)
1 heaped tsp baking powder
1/2 heaped tsp bicarbonate of soda

Method:
1. Preheat the oven at 140C (280F) fan assisted.
2. Mix the egg white powder and egg whites together with 60ml water. Use an electric whisk to mix well.
3. Add the chickpeas and use a hand blender to blend them up with the egg whites. You want them as smooth as possible.
4. Add the other ingredients (apart from the chives, baking powder and bakin soda) blending as you go ensuring a smooth mixture that’s more like a cakebatter than a bread. If you think your mix is too wet you could add a little more protein cheese or flour. Just a little coconut flour can dry out mixes, so you could add a touch of that.
5. Finally add your baking powder, bicarbonate of soda and chives and give it a final blend/good mix.
6. Pour into a 2lb loaf tin and bake in the middle of the oven for 35-40 mins.

Macros per slice: 73kcal, 11.3P, 4.8C, 1.1F
Macros for whole loaf: 1,319kcal, 203.7P, 86.5C, 20.7F

img_5016
Toasted and buttered – so delicious!

High Protein Chickpea cakes

FullSizeRender

After my black bean brownies were a big success I wondered what I could try next with beans. I had a tin of chickpeas in my food cupboard so I thought I’d experiment by following the same recipe but with chickpeas instead of black beans and by adding a few more ingredients to theme the cakes. I decided to keep it quite simple and make a vanilla cake and a lemon cake.

It was a big success. The cakes had a great rise and didn’t deflate. The cake batter tasted lovely as I mixed it and the final bakes tasted good too. The texture also seemed right so I did have a good feeling that they would turn out as I hoped.

img_4953
A good rise in the individual brownie pan

I think that you could make many different types of cakes with the base recipe. Carrot cake, coffee and walnut cake and even a cheese and chive loaf using some Parmesan and Eat Lean protein cheese. Watch this space!

Vanilla & Raisin and Lemon & Chia Chickpea Cakes

Serves: 7 cakes
Ingredients:
2 egg whites
20g egg white powder + 60ml warm water or 30ml if doing the lemon version as you’ll be adding lemon juice (or another 2 egg whites)
37g vanilla flavour whey (I used Protein Dynamix Vanilla Ice Cream)
1/2 can chickpeas, drained (I used Aldi Sweet Harvest)
10g Coconut flour
1/2 banana
35g Quark (or 0% greek yogurt, or cottage cheese)
1/4 tsp Bicarbonate of Soda
3/4 tsp Baking powder
1g powdered sweetener (or more to taste)

For the vanilla version:
35g raisins (soaked in 20ml unsweetened almond milk)
1/2 tsp vanilla extract
1/2 tsp vanilla bean paste (optional)

For the lemon version:
15g Chia seeds
30ml lemon juice
1/2 Tbsp grated lemon rind
30g Lemon curd (optional)

Method:
1. Preheat the oven to 140C (fan)
2. Blend all of the ingredients together apart from the raisins and chia seeds. After blending add the raisins/chia seeds, stir them in and mix well.
3. Pour the mixture into your pan. I used a silicone individual brownie pan and greased with with a few squirts of fry light. You could use a bigger pan or muffin cases.
4. Bake for 15-20 mins.

snapseed-3
Straight from the oven

I used some Lightest Philadelphia to make frosting mixed with some powdered sweetener, a little almond milk. For the vanilla ones I put jam and phili in the middle and phili mixed with birthday cake flavour whey on the top. Sprinkles were compulsory. My own little party on a plate! Lol!

snapseed-4
Party time

Black Bean Protein Brownies Recipe

Wow! Black bean brownies are protein baking at it’s finest. I’d seen lots of recipes online about using black beans in brownies, but had never tried it. I did some research and put together something that I thought would work. They had to have awesome macros with more protein than carbs. I was inspired the most by Chocolate Covered Katie and Protein Pow. My recipe is most like the Protein Pow one, but slightly adapted. I also didn’t bake it for as long and I don’t think that it needs more than half an hour in the oven as it bakes pretty quickly.

snapseed-1
The final product topped with some MuscleFood Prutella and mini jazzies
Optional ingredients: I added chocolate chips, but in future bakes I’ll leave them out. They just end up sinking to the bottom and disappearing. When I bake my usual brownies I find that I have to put BIG chunks of chocolate in them for them to not totally disappear so I should have remembered that. That will also cut the total calorie count by 140kcal. I added 20g (about a tablespoon) of peanut butter to help increase the fat content (I find it hard to hit my fat macros) but I would probably leave it out if I did it again. It didn’t bring anything exciting to the bake. The sugar free chocolate syrup worked really well though. The Hershey’s sugar free chocolate is absolutely awesome and I have a cupboard full of the stuff!

Served with Peanut butter and ice cream

I like to use half egg whites and half egg white powder. From baking my pancakes, I’ve found that if the pancake is all egg whites then it rises and then rapidly falls when taken off of the heat. Using all egg white powder creates pancakes that are like big solid disks that don’t deflate. I’ve used half and half here so that the bake isn’t too solid, but it also doesn’t totally deflate when removed from the oven. Substitute 10g egg white powder for 1 egg white. You need to add about 2tbsp warm water for every 10g of powder.

To mix the ingredients, use whatever blender you have. I found than a hand blender worked really well and blitzed everything up into a nice, smooth pourable batter. The mix will be slightly runnier than a standard brownie mix.

img_4884
You’ll end up with quite a runny batter
img_4888
Straight out of the oven

Black Bean Protein Brownies

Serves: 16 pieces

Ingredients:
4 egg whites
40g egg white powder + 120ml warm water (I use MyProtein Egg White Powder)
75g chocolate flavour whey (I used MyProtein Chocolate brownie)
1 can black beans, drained (I used Biona organic)
20g Coconut flour
75g Quark (or 0% greek yogurt, or cottage cheese)
1 tsp Bicarbonate of Soda
20g Coco powder
2g powdered sweetener
2 Tbsp honey

Optional Extras:
2 tbsp chocolate sugar free/zero cal syrup (I used Hersheys, you could use Walden Farms, Slender chef, etc.)
25g chocolate chips (or any other ingredients that you want to add in like dried fruit or chopped nuts)
20g peanut butter (I used Meridian)

Method:
1. Preheat the oven to 140C (fan)
2. Mix everything together and used a blender or hand blender to blend it all up into a smooth mixture
3. Line a square brownie tin with greaseproof paper and add the mixture to the tin.
4. Bake for about 30mins for a firmer cake-like brownie. Cut to 15-20 mins if you’d like a softer brownie and then refridgerate to help it set.

Macros for the whole mix: 1360kcal, 156P, 128C, 32F
Macros per serving: 85kcal, 160P, 8C, 2F

Compare these macros with the “normal” brownies I make in the same tin, cut into the same size (16 servings): 292Kcal, 4P, 28C, 18F (Following this recipe). You could eat 4 of these for one of those!

img_4890
Firm and cakey inside (with sunken choc chips!). Cut down the baking time and set in the fridge if you want a more gooey brownie

Protein Mac & Cheese

We visited a restaurant a few weeks ago and my other half had an epic steak which came with fries as well as a side of Mac & cheese. I tried a spoonful and it was EPIC! My memories of Mac & Cheese are from trying the stuff you get in a tin when I was a kid and thinking it was the most disgusting thing I’d ever eaten. I never had Mac and cheese ever again until the other week. It’s essentially pasta in a cheese sauce though, isn’t it? And I’ve had plenty of that so I decided to see if I could recreate a high protein version and it turned out really successful.

Protein mac & cheese with a side salad

The first hurdle was a cheese sauce, typically these are high in fat (cheese, milk and butter!!!!!) and high in carbs (flour!) so I needed to completely change the macros. I had some Pea protein powder in my cupboard and read that it’s a pretty good powder to swap for flour, particularly with cheese sauces. I swapped flour for this, swapped the milk for unsweetened almond milk (way lower in calories at 13kcal per 100ml) and swapped the full fat cheese for some Eat Lean protein cheese plus a little parmesan to help add a stronger cheese taste. After gently heating and mixing my sauce, the cheese didn’t fully melt because it’s quite a hard cheese, but it was very nearly there and once mixed in it wouldn’t matter. It tasted really good too.

You could just stick with the macaroni pasta and cheese sauce if you want minimal Mac & cheese, however, I wanted to turn this into more of a meal so added diced onion, chicken and broccoli plus a little diced celery for a low calorie bulk. I did mean to add a little mustard powder to help colour it, but I totally forgot. I’ll try that next time. Tastes absolutely fine without it though.

Mixing it all into the cheese sauce

If you want to add even more protein (and less carbs) you can swap out the macaroni pasta for some Dr. Zak’s High Protein pasta (70P, 23C per serving), or to completely win with the macros, use Carbzone Low carb penne (75P, 15C per serving). I stuck with normal Macaroni for mine though because carbs are good! 😀

Protein Mac & Cheese Recipe

Serves: 4 people

Ingredients:
For the Sauce:
40g Pea Protein powder
400-500ml, Unsweetened Almond Milk
100g Eat Lean Protein Cheese
4 tbsp Grated Parmesan Cheese
2 cloves garlic, diced
Salt, to taste

For the mix:
400g Chicken Breast, cubed
200g Macaroni Pasta*
200g Onions, diced
200g Broccoli, split into small florets
200g Celery Sticks, diced

*For higher protein and lower carb, swap the macaroni for 200g Dr. Zak’s High Protein pasta, or Carbzone low carb penne pasta.

Method:
1. Boil the Macaroni pasta in salted water according to the packet.
2. Steam the broccoli in the microwave for a couple of minutes to soften.
3. Fry the diced onion, celery and chicken on a low heat.
4. Put a pan on a very low heat with a few squirts of oil and gently fry the garlic.
5. Add the pea protein powder and a little almond milk to the garlic, stir. You want to add a little almond at a time and keep stiring to form a smooth sauce. Stop when you have a slightly runny sauce which still coats the back of the spoon.
6. Add all of the cheese and parmesan to the sauce with a little salt. Stir gently until the cheese has mostly melted. If you’re using protein cheese you may find that it doesn’t fully melt.
7. Drain the pasta and add it to the cheese sauce along with the steamed broccoli, fried chicken, onions and celery.
8. Mix well to ensure that everything gets coated in the sauce.
9. Put in one big ovenproof dish, or 4 individuals.
10. Oven bake for 20mins on 180C (fan assisted).

Macros: 433kcal, 51P, 44C, 5F (Per serving)
Macaroni replaced with Carbzone penne: 415kcal, 75P, 15C, 6F
Macaroni replaced with Dr. Zak’s HP pasta: 451kcal, 70P, 23C, 8F

Idli/Dosa Pancake Experiments – South Indian Cuisine

My work colleague is from South India. I was telling him about my pancake creations and he said that I should try some Indian pancakes. We got chatting about them and the different ingredients and it sounded like good fun. These aren’t protein pancakes by any shape or form. Although they have lentils in they are mostly carb with a tiny bit of protein. However, you can definitely enjoy them with a chicken curry or Tandoori Chicken Tikka to up the protein count.

img_4402
Idli with coconut chutney
As this was all totally new to me I researched a lot of recipes.Idli are like little steamed buns and Dosa are larger pancakes like crepes. My colleague confirmed that I could use the same “batter” for my Idli and Dosas so I set to work. Making it was quite fun and reminded me of when someone gave me a sour dough mix called “Herman” for me to grow, use, and pass on. You first rinse and soak the rice and lentils. Next you blend the rice and dal (separately) with water, mix them together, and then leave them in a warm place to ferment and rise.

img_4570
Soaking the urid dal (left) and rice (right) separately

img_4572
After leaving to ferment, little air bubbles will be visible in the mixture
The quantity of rice to urid dal is quite easy to get the hang of. It’s 1 part lentils to 4 parts rice so 1 cup rice + 1/4 cup urid dal or 100g rice to 25g Urid Dal. Recipes on the web are quite mixed about which rice to use. My first attempt was with basmati rice. The Idli were nice, but the Dosa batter just wasn’t right. I couldn’t get the pancake to expand to the edge of the pan. My colleague suggested using some really cheap supermarked value/essential/economy rice. The cheapest possible, e.g. Tesco Everyday Essentials long grain rice for 45p a bag rather than basmati. I then tried two different mixes the next time around: For one of them the rice part was 1/2 cup cheap long grain + 1/2 cup parboiled rice (the pouches of rice that you can microwave for 2 mins and serve). The other mix was 1 cup cheap long grain rice.

The mix with the parboiled rice resulted in wetter idli and less crispy, thicker dosa. This wasn’t what I wanted. The mix with just the cheap long grain made nice, dense idli and thin and crispy dosa so I decided that that was the mix I was sticking with.

img_4417
Masala dosa (stuffed dosa)

img_4665
Plain idli and stuffed idli (Same stuffing as the dosa above)
I managed to get my dosa to stretch to the edge of the pan too so it was perfect! So here is my final recipe…

Idli/Dosa Batter

Ingredients:
1 cup uncooked cheap long grain rice (+ 1 cup cold water)
¼ cup Urad dal (1 cup cold water)
¼ tsp Fenugreek seeds
Salt (to taste)

Method to make the batter:

1. Rinse rice in a bowl and Fenugreek seeds + Urid Dal in another bowl. Rinse really well with lots of water changes and rub the grains together.
2. Soak the rice in 1 cup of water. Soak Urad Dal + Fenugreek seeds in 1 cup of water in separate bowls with cold water for 4 hours
3. Drain both but save the water in individual bowls.
4. Blend the Dal with ¼ cup of its reserved water. Blend until smooth and gradually add more water. You need 3 x water to Dal (so ¼ cup dal needs ¾ cup water). You should end up with a really smooth paste.
5. Transfer into a big bowl.
6. Add rice to blender adding water as needed (approx ¼ cup total – you don’t add much water to the rice). Blend (pulse) until slightly coarse. The rice shouldn’t be as smooth as the dal. If you feel it with your fingertips you should feel little grains.
7. Add rice to same bowl as dal with some salt and mix well.
8. Cover with tea towel and place in warm spot (the airing cupboard where our water heater stands is where I put mine) for 8-10 hours.
9. After it’s been left to ferment, stir the fermented batter and you should see little air bubbles. Your batter is ready!

Method to make Idli:

To make Idli, you can use an egg poacher pan like this one (you can get special idli steamers, but my egg poacher pan does the same thing).

  1. Fill the pan with water as if you’re poaching eggs and allow to boil.
  2. Spray the 4 cups with oil and put around 2 tablespoons of batter in each cup, they won’t reach the top like eggs do.
  3. Put the lid on and leave to steam for 4-5 minutes. They are done when the top of the Idli is firm.
  4. Wet a spoon and use it to scoop the Idli from the cups. Serve dipped in coconut chutney, mango chutney is very nice with them too. This is a nice recipe for coocnut chutney. I add a little granualted sweetener as well to mine though.

Method to make stuffed Idli:

  1. Repeat the normal Idli method, but instead of putting 2 tablespoons of batter in the cups, add one tablespoon and steam for a minute or so to ensure it’s a bit solid.
  2. Add the filling (e.g. potato-based saag aloo, curry, chutney, etc.) then add another tablespoon of batter to the top.
  3. Replace the lid and continue to steam for another 4-5 minutes

Method to make dosa:

  1. Add a little water to your batter mix. Not too much, just enough for it to pour into the pan and coat the bottom.
  2. Heat a non-stick frying pan on a low heat with a few sprays of oil.
  3. Take a big ladle of the batter and add to the pan. Move the pan around to reach the sides and use the base of your spoon to help spread the batter to the edges. If you don’t have enough batter in the pan, add a little more any bits that are missing and it’ll fuse together. Cook for a few minutes on that side before flipping and cooking the other side.
  4. You can then either fill the pancake with a mix or cut it into quarters and dip in a chutney. For mine, I make a filling using potato, chicken, onion and spices. You could also add spinach, peas or any other veggies that you like. It’s quite a dry mix, rather than a saucy curry or dal. I follow this recipe, but add chicken and extra veg.

Carrot cake Protein Pancakes

Carrot cake is one of my favourites. I love the spices and delicious frosting so it made sense to see if I could create a pancake version. I was surprised at how delicious it turned out, just like a big slab of carrot cake.

img_4541
It’s also macro friendly at under 400 calories with really high protein. You could lower the carbs a bit too by adding a few less raisins and a little less carrot.

Carrot cake protein pancakes

Serves: 2 people

Ingredients:
The pancakes
My usual pancake recipe
200g grated carrot (use about 180g and reserve the rest as topping)
Sweetener
40g raisins
12g chopped walnut pieces
2 tsp pumpkin pie spice (or 1/2 tsp ground cinnamon, 1/2 tsp ground ginger, 1/2 tsp ground cloves, a sprinkle of nutmeg, a little sweetener is the spice mix is a bit bitter)

The frosting
Version 1 (a wet frosting) : 120g Philadelphia (I used “lightest”) + 60ml unsweetened almond milk + 1 tsp grated orange rind + sweetener to taste
Version 2 (a firm frosting): 60g Philadelphia + 6 heaped tsp Greek yogurt + 1 tsp grated orange rind + sweetener to taste.

The topping
2 whole walnuts
20g grated carrot + sweetener
Sunflower Seeds, pumpkin seeds, apple pieces, chia seeds, chopped nuts etc. Anything you want, or nothing at all! I added some Chia Charge honey trail mix and a sprinkle of bee pollen.

Method:
1. Add the grated carrot to a frying pan on a very low heat. Add the raisins, walnuts, sweetener and half the spices. Fry for a few minutes to soften and let the lovely flavours sink in. Take off the heat and leave to cool.

img_4448

2. Make the pancake mix as usual. A cinnamon flavour protein powder will go well, if you don’t have this then vanilla will work. Add the rest of the spices to the pancake mix.

3. After blending the mix, transfer it to a bowl then add the cooled carrot mixture and stir well.

img_4449

4. Fry the pancakes as usual. Use a spoon to scoop the mix into the pan to ensure you get a good balance of mix and carrot in each pancake.

img_4450

5. Allow the pancakes to cool completely. I made mine the day before and transferred them to the fridge until the next day. As long as they are cool enough to stop the frosting melting then they will be fine.

6. Make the frosting. Version 1 will 1 will give you a runnier frosting and version 2 a firmer one. Just mix all the ingredients together with a hand whisk.

7. Layer the pancakes with about 1 tsp of the frosting in between each one and then some on top.

8. Finish your stack with the topping of your choice.

9. Devour and enjoy with a cup of tea!

Macros: 367kcal, 38C, 33P, 10F (per serving)

Raisin and cinnamon custard pancake pudding

img_4171

This is such an awesome dessert that I feel that it should have it’s own recipe. I also feel like it deserves an exciting name! I call it “Protein Pancake Pudding” but that doesn’t really tell you much. “Raisin and cinnamon custard pancake pudding” is a little more exciting so we will go with that!

It’s basically my pancake recipe made into silver dollar (very small) pancakes, layered in an ovenproof dish, covered in flavored yogurt and raisins, then baked in the oven. It is DELICIOUS and I’ve made it 5 times now because we love it so much. It’s just like bread and butter pudding, but with a healthy twist. So here’s the recipe…

Raisin and cinnamon custard pancake pudding

Serves: 2 people

Ingredients:
A batch of my pancakes (Follow the recipe here and use Cinnamon flavored protein powder. MyProtein’s Cinnamon Danish is delicious. Otherwise, vanilla flavor with 1/2 tbsp cinnamon would work)
1 pot of Muller Light yogurt Banana and Custard flavor
1 egg, beaten
1tsp Cinnamon
50g raisins (You could swap for blueberries, chopped dried apricots, whatever you like)
50ml unsweetened almond milk
A few squirts of fry light

Method:
1. Make the pancakes by following the usual recipe.
2. In a bowl add 1 pot Muller light, the egg, cinnamon and almond milk.
3. Layer the pancakes in your oven proof dish and work out how the layers will work (i.e. depends on the size of your dish and how many you’re going to get in each layer).
4. Add the bottom layer of pancakes, spoon over some of the yogurt mix (I usually add 1 tbsp yogurt per pancake so if your bottom layer has 2 pancakes, add two spoons of yogurt mix), sprinkle with a few raisins.
5. Repeat this for all layers. Depending on the size of your dish you’ll end up with 2-4 layers. Hopefully you’ve got a bit of extra yogurt left to add some more to the top, and a few extra raisins too. Add a few squirts of Fry Light to the tops.
6. Bake in the oven at 160C (fan) for 15-20 mins.
7. Serve warm with a big scoop of ice cream on top. Heaven!

Macros: 298kcal, 29.7P, 30.1C, 5.4F (Per serving, without ice cream)

Save

Snickerdoodle Baked Oats

Take your oats to the next level by popping them in the oven for about 20 minutes. You could make whatever flavour you want, but peanut butter and chocolate is always a winner…

IMG_4195

You’ll need a small casserole dish/ramekin like one of these to bake it in. No need to put the lid on though.

Ingredients
30g oats
1/2 a banana, mashed
2 Tbsp powdered peanut butter (I use PB2)
75ml unsweetened Almond milk
1 Tbsp sugar free chocolate syrup (I use Hershey’s as its awesome)
1 egg white
Sweetener to taste

Method
1. Mix well in a bowl and then add it all together in your mini casserole dish. I like to leave mine to soak overnight, but if your short on time just bung it in the oven for 20 mins at 160C (fan).

IMG_4186
2. The mix should rise, but not overflow.

IMG_4194
3. Top with a chopped up protein bar, Snickers protein works best of course! Drizzle with a little Hershey’s sugar free syrup and zero calories Caramel sauce

IMG_4195

Macros: 240kcal, 41C, 12P, 4F (without the topping)

Save

Protein Pancakes Recipe

Recently I’ve been pretty obsessed with protein pancakes. Why? Well, I worked out something about myself. I worked out that if I had something sweet, awesome and tasty to look forward to at the end of the day then I could get through the day without cheating, losing track, or being tempted by “Do you want one?” biscuit/cake/donut/sweet offers from work colleagues!

Protein bars didn’t cut it. They were nice, but they’re a snack not a dessert. Proats were OK, but I started having them for breakfast instead. So cue protein pancakes! They’re definitely not a snack, they’re a meal! Protein pancakes FTW!!!!!! I even added myself an extra 4th meal for each day of “Dessert” in MyFitnessPal. It does of course mean that other meals/snacks are cut slightly lower in calories so that the pancakes fit my macros, but it is so worth it. Depriving yourself of things you love, demonising foods or only eating things that are considered “a healthy option” sets you up for binge eating which is why I am such a fan of IIFYM. Saying that, my pancakes could probably be considered to be a “healthy option” however, you can get really naughty with the toppings and enjoy yourself.

Pancakes are great, because I can add my base recipe to my food diary for the day (along with the compulsory dollop of low cal ice cream) and then get creative with the toppings depending on the macros I have left in the evening or the ingredients I have available. Lots of variety and lots of fun creating them.

So my experiments began and I tried lots of different recipes with the main aim of something low cal, high protein, not too high on the carbs. However, I didn’t want it to taste like a pile of flavourless rubber AND didn’t want it to look like a sea creature in the pan (i.e. it needed to hold a circular shape when poured in). As you can see, this early attempt wasn’t very circular…

img_4047-1
An early pancake creation… interesting… lol!

My mix does work best when done in a pancake pan with individual holes or in little circular/shaped pancake moulds, but if you omit the Almond milk it should hold it’s shape in a normal frying pan. The key to making this recipe work is adding a lid to your pan so that the tops steam as the bottoms cook. The pancakes will slowly rise due to the bicarb/baking powder in them, but as they rise the tops will steam. You can then flip them without the batter spilling everywhere. You should get a nice golden pancake like this…

IMG_3855
My awesome pancake pan

EDIT 26-03-17: I tried swapping the egg whites for egg white powder. Doing this seems to create a more solid pancake which doesn’t deflate when taken off of the heat. I think it’s a tiny bit too solid, but half and half does seem to work really well. Each egg white is about 10g egg white powder + 30ml warm water. Feel free to experiment and see what combination you like best.

Cass’ Protein Pancakes (Serves 2)

Ingredients
4 egg whites (or 40g egg white powder + 120ml warm water, or 20g egg white powder + 60ml warm water)
40g whey protein powder (whatever flavour you like)
1/2 banana
1/4 tsp bicarbonate of soda
1/2 tsp baking powder
50-100ml unsweetened Almond milk

Method
1. Spray the pan with a few squirts of fry light and heat it on a low to medium heat for a good few minutes.

2. Pour the mixture into the pan and pop the lid on. Watch the pancakes rise and once the top is steamed/set it’s ready to flip. It’ll take 1-2 mins.

3. Cook the other side for a minute or two before removing and cooking the rest of the mixture.

4. Get inventive with some delicious toppings and enjoy!

Macros: 134 calories, 21.6P, 7.8C, 1.2F (per serving)

The mix can be turned into waffles too. Just fill a 4 waffle silicone tray with the mix and bake for 10 mins on 180C. You could also cool the pancakes and add Greek yogurt or quark in between for a Protein tiramisu. Layer them with custard or flavoured yogurt + an egg + raisins then bake in the oven for 20 mins at 160C for a pancake variation of bread pudding.

Save