Protein Syrup Sponge Pudding

After having a few successes creating protein brownies using pumpkin puree, I decided to try my hand at a treacle sponge pudding. For the brownies I did use a whole bar of dark chocolate, however, because there isn’t a ton of sugar and butter to accompany it, the brownies end up low in calories. I followed the theme with this recipe and used 100g of Lyle’s Golden Syrup. It’s pretty much the same recipe as my brownie one, but with golden syrup rather than chocolate and flour rather than cocoa powder.

Serves: 12 slices
Ingredients:
75g unflavored whey (or vanilla, salted caramel, etc.)
1 egg
2 egg whites
40g self raising flour
1tsp Baking powder
100g Lyle’s golden syrup
2 Tbsp MyProtein Maple syrup (Or other zero cal syrup)
1/2 tin (210g) pumpkin puree
50g Sukrin Gold (or equivalent powdered Sweetener)

Method:
1. Preheat oven to 160C.
2. Mix the whey, flour, baking powder, syrups and pumpkin puree in a bowl.
3. In a separate bowl whisk the egg whites, egg and sukrin and powdered sweetener for a couple of mins.
4. Add the egg mix to the other bowl and whisk together to mix well and get rid of any clumps of powder.
5. Pour into a rectangular tin and bake for 20 mins. Note: I line my tin with greaseproof paper.
6. Nice served warm with low fat custard and an extra squirt of golden syrup

Macros per slice: 79kcal (1F, 10C, 7P) Note that I haven’t counted any carbs from the sukrin/powdered sweetener.

Protein Chocolate Brownies

I’ve enjoyed some yummy chocolate brownie creations made from black beans, however, I thought I’d try a variation using pumpkin puree. For these brownies I adapted the recipe I always use for normal brownies which has won me three awards in the little baking competitions I’ve done at work and for fundraising events. It makes fantastic brownies.

I’ve used my recipe variation about 4 times now and it always tastes good. As I use a bar of dark chocolate rather than relying on the whey and zero cal choc syrups to bring the chocolate flavour these brownies have a really good chocolate taste to them. To get the right texture to the mix I add a little unsweetened almond milk. I feel that the mixture resembles my usual mix a bit better when I do that. Feel free to add normal milk if that’s all you have.

I like to serve them with a squirt of choc shot on top, microwaved for 40 seconds and then topped with some low calories ice cream.

Serves: 12 brownies
Ingredients
1/2 tin (210g) pumpkin puree
40g Cocoa powder
75g chocolate whey (I use MyProtein Choc Brownie flavour)
1tsp Baking powder
1 egg
2 egg whites
75g Sukrin gold (Or equivalent powdered sweetener, e.g. 1tsp Canderel = 5g so 15tsp Canderel would substitute it)
150ml Unsweetened Almond milk
2Tbsp Hersheys Sugar Free choc syrup (Optional)
2Tbsp Choc shot (Optional)
1 bar (150g) dark cooking chocolate

Method
1. Preheat the oven to 160C
2. Break the chocolate up into small chunks. Give it a good smack with a rolling bin to break it up! Put it in a glass bowl. You can then either melt it over a saucepan of water, microwave it, or place the bowl in larger bowl of boiled water to gently melt the chocolate. Once melted, leave it to cool while you follow the rest of the steps…
3. Mix the pumpkin puree, cocoa powder, whey, baking powder, syrups, and almond milk in a bowl.
4. Whisk the egg, egg whites and Sukrin/Sweetener in a bowl for a few minutes. Add to the other mix along with the chocolate and then whisk it all to combine and remove any clumps.
5. Bake for 20-25 minutes. Check it at 20 mins. It should firm all over, but not too solid. You want to have a bit of give in the bake to retain that nice gooey brownie taste.

Macros (per serving): 122kcal (6F, 8P, 11C)

Protein pumpkin pie

I had an amazing visit to a pumpkin patch this weekend where I picked a pumpkin and a load of lovely squashes. Families were filling their wheelbarrows with the biggest pumpkins they could find so that they could carve them for their Halloween decoration. What a waste! 😉 I was strolling around looking for the pumpkins that I thought would make the most delicious food.

After enjoying some delicious roasted sweet dumpling squash for dinner, I made a pumpkin pie. However, I didn’t use fresh pumpkin but canned pumpkin purée instead. I find that this is less watery so helps keep the filling solid. Luckily you can find this in most big supermarkets in the UK. Waitrose, Ocado and larger Tesco stores have all been a good, cheap source when I’ve needed it.

I wanted to create a healthier pie so the first thing to tackle was the case. Instead of using pastry, I used pizza dough. I used a 220g ball of Northern Dough Co original dough as I had some in the freezer, but you could make your own and use that instead. Just make sure you have about 200g of it.

I did some Googling for the filling and found that someone else had successfully used protein powder in their pumpkin pie so I thought I’d try that too. Rather than double cream or condensed milk I used light cream cheese (aka soft cheese).

To ensure that my pie baked as I hoped I first stretched the dough out in the case, added some baking beads and baked it for 5 minutes at 160C. I then added the filling and baked for 30 minutes at the bottom of the oven. I then covered it tin foil and baked for an additional 20 minutes. By then, the filling was baked and set as I hoped so that when sliced it stayed firm.

It tasted sweet, spiced and delicious, just as I hoped. I’ve only ever tried a small slither of pumpkin pie before, but this turned out as delicious as I hoped with a fraction of the calories that the normal version has.

Protein pumpkin pie recipe

Serves: 8 slices
Ingredients
200g pizza dough (I used a 220g ball of Northern Dough Co original dough)
550g canned pumpkin purée (although one 400g can would probably be enough)
200g light cream cheese
60g cinnamon whey powder (I used MyProtein cinnamon danish)
3 eggs, beaten
75g Sukrin gold (or other sweetener)
1/2tsp ground cinnamon
1/2tsp ground ginger
1/4tsp ground cloves
1/2tsp ground nutmeg

Method
1. Preheat the oven to 160C (fan).
2. Roll the dough to fit a flan case and cover it as you would pastry. Fill with baking beads and bake for 5 minutes.
3. While the dough is baking add all of the other ingredients to a bowl and whisk until smooth.
4. Remove from the oven, empty out the beads and add the pie filling.
5. Bake for 30 mins then cover with foil and bake for 20mins.
6. Remove from the oven and leave to set and cool.

Macros (per slice): 187kcal, 14P, 19C, 6F.

Pumpkin Spice Muffins


Happy Autumn everyone! 😀 I’m a very happy baker as it’s my favourite season and accompanied by the hashtags #pumpkinspiceupyourlife and #pumpkinspiceeverything. I have a cupboard full of tinned pumpkin puree and a tub of Pumpkin spice and I’m ready to go!!!

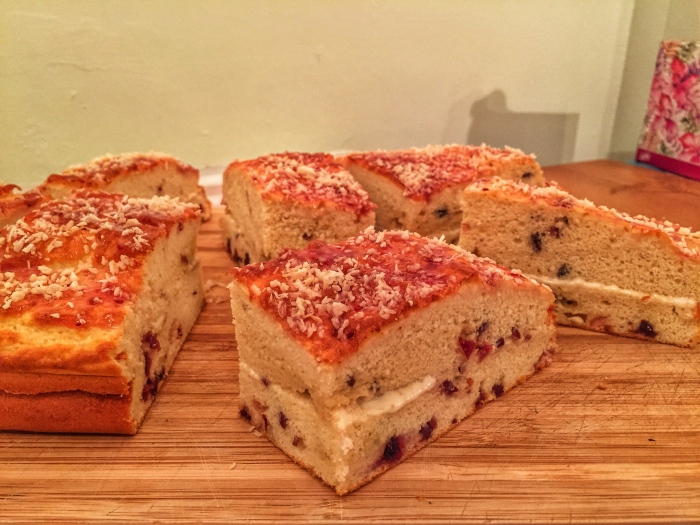
I’ve been saving this cake for Autumn and it didn’t disappoint. As I added pumpkin puree, I cut back on the yogurt from 100g to 50g although you could probably leave it out completely. Instead of making a big cake I made 8 individual big muffins. Using a cupcake corer I then removed the insides and spooned in some pumpkin/philadelphia filling. The topping is slightly different without the pumpkin. You could use the same topping/filling for both though. I was really impressed with how moist the muffins came out. I think this creation is as similar to “normal” cakes as I’ve gotten so maybe the pumpkin puree would be a good addition for all of my chickpea protein cake creations.


For the Pumpkin Spice mix you can of course buy it ready made. It’s a bit tricky (aka expensive) to find over in the UK though. However, it’s so simple to make your own! I followed the recipe from Betty Crocker and made a big tub then I dip in whenever I need some. I’ve used 5tsp in this recipe, although I don’t think adding 6-7 tsp would hurt if you love your spices. I’ve found, however, that the spices can add a little bitterness. I think it depends on the brand. Taste your cake batter and see what you think. To counteract that I added about 15 Stevia drops. The spice bitterness didn’t come through to the final bake so that worked well.

To finish things off I made some little fondant pumpkins by rolling some balls of orange fondant. Then I rolled thin sausages of green fondant and wrapped them round a cocktail stick and stuck them to the pumpkins. This was just to add a fun little decoration.

I’ll definitely be making these again. I think I’ll add 6tsp of spice mix next time though and leave out the mixed peel. My other half thought the spice level was just right, but I want a tiny bit more for extra yum!

Pumpkin Spice Muffins

Serves: 8 big muffins
Ingredients
Cake (Wet Ingredients)
200 gram Tinned Pumpkin Puree (I used Libby’s)
1 Tin Tinned Chickpeas In Water
50 gram Brooklea 0%
4 egg whites
10g Slender chef Cinnamon syrup (Or other zero cal syrup)
10-20 Stevia drops
~80ml water

Cake (Dry Ingredients)
40g Egg White Powder (I use MyProtein Egg White Powder)
75g Cinnamon whey (I used MyProtein Cinnamon Danish, however, you could use vanilla + extra ground cinnamon)
25g Coconut Flour
30g Sukrin gold (Or other sweetner equivalent)
5tsp Pumpkin spice mix (see recipe below)
35g Mixed Peel (optional)

Cake (Rising Ingredients)
1 tbsp Baking Powder
1/2 tsp, Bicarbonate of Soda
15ml (1 Tbsp) lemon juice

Filling
75g Lightest Philadelphia
50g Pumpkin Puree
½-1 tsp ground Cinnamon
1-2 tsp powdered sweetener

Topping
1tsp Vanilla Bean Paste
1tsp Ground Cinnamon
2-3tsp powdered sweetener
105g (i.e. the rest of the tub) Lightest Philadelphia

Pumpkin spice mix (From Betty Crocker)
3 tablespoons ground cinnamon
2 teaspoons ground ginger
2 teaspoons ground nutmeg
1 ½ teaspoons ground allspice
1 ½ teaspoons ground cloves.

Method
1. Preheat the oven to 180C.
2. Add all of the dry ingredients to a bowl
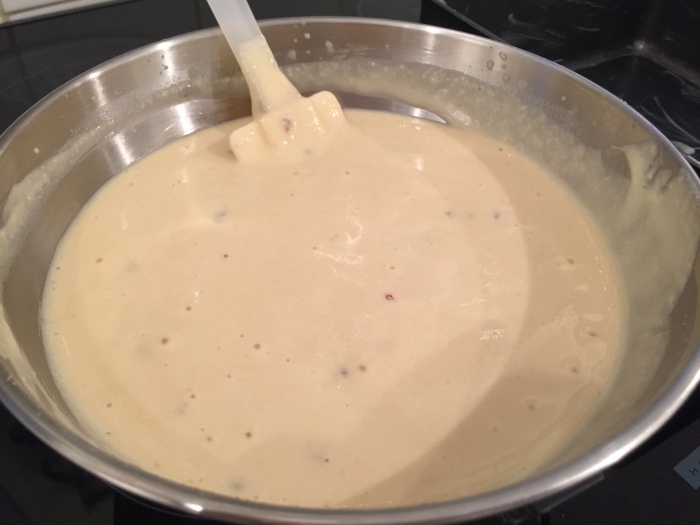
3. Combine all of the wet ingredients, apart from the water, and blend until smooth. If the mixture needs it, add some of the water. Pour the wet ingredients to the dry ingredients and use the remaining water to rinse out the blender and add to the mix.
4. Use an electric whisk or hand blender to combine the mix until smooth.
5. Grease the muffin tin/cups with a few squirts of Frylight.
6. Finally add the rising agent and blend/whisk well to combine.
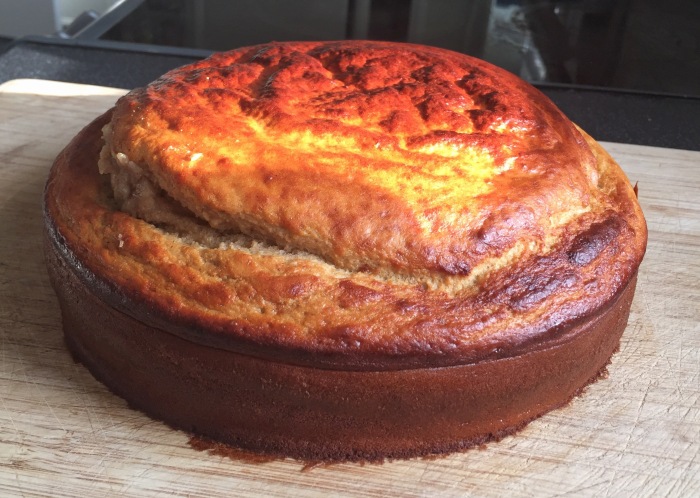
7. Add the mix to the muffin cups. I use very deep muffin cups and fill with 3 scoops of batter which leaves about 1.5cm gap at the top. I then bake for 23 minutes in the middle of the oven. Reduce your cooking time if you’re using smaller cases/less batter.
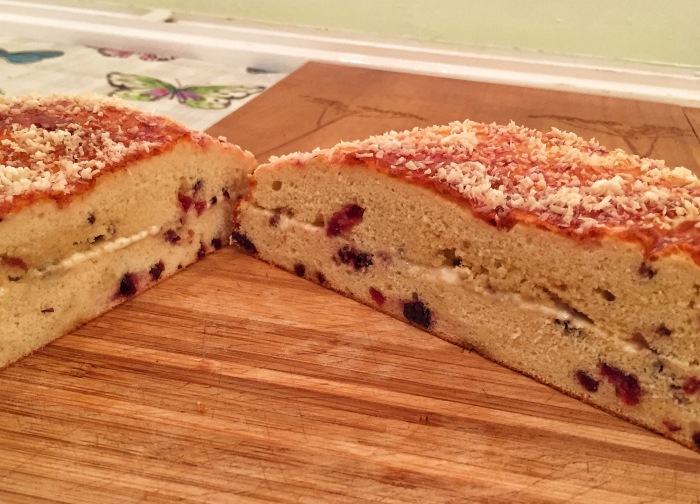
8. Allow to cool and then remove the middle with a cupcake corer, preserving the top to pop back on.
9. Combine the filling and topping ingredients in separate bowls. Spoon the filling inside, pop the muffin top back on and then spoon on the topping to cover. Repeat until all muffins are filled and covered.
10. Place in the fridge for the topping to set.

Macros (Per serving): 172kcal (20P, 15C, 3F)

Thai Pumpkin Soup


I make Thai pumpkin soup every year, several times. It’s an easy, fool proof recipe that you can easily tweak. If you want more spice you can just add more chilli or curry paste. It works with either red or green paste or you could make a big batch, half the ingredients and add red paste to one mix and green to the other to give a bit of variety. On it’s own the pumpkin can make the soup taste a little watery. I find adding the butternut squash gives it a little more body and makes the soup a little sweeter and silkier.

I’ll add a note on tins of coconut milk. These can vary massively. I used the “Full Moon” brand which was about 80 kcal per 100ml. I think this technically means it’s a light coconut milk. In reality it means it’s “Watered down”. Basically, the more calories in your coconut milk per 100ml the less watered down it is. If you want a strong coconut taste then opt for the full fat high quality version, like Biona. You can check the % of coconut on the back of the tin. Picking the lighter/lower % cans will of course mean less calories and fat in your soup.

I like to roast my pumpkin before adding it to the soup. For this recipe I add some spice pastes to the pumpkin wedges to add some extra flavour. The wedges taste delicious and I have to hold back from gobbling them all straight out of the oven!!!

Thai Pumpkin Soup Recipe

Serves: 2
Ingredients
For the roast veg
200g, Roasted Butternut Squash
250g, Roasted Pumpkin
30 sprays coconut Frylight
1 Tbsp light soy sauce
½ Tbsp chilli paste
½ Tbsp garlic paste
½ Tbsp lemongrass paste
½ Tbsp ginger paste

For the soup
100 ml Coconut Milk (I used Full Moon)
40-50g, Thai Curry Paste (I used a 45g M&S red Thai curry shot)
500 ml chicken or veg stock made from directions
½ tsp, Fish Sauce (optional)
50g diced brown Onion
2 Tbsp diced, fresh corriander stalks
2 spring onion, sliced
1 Tbsp fresh corriander leaf, chopped

Method
1. Preheat the oven to 180C. Cut up your pumpkin and butternut squash wedges and put in a big bowl. You can leave the skin on and peel it off after roasting. It’s a lot easier to do this than cut the skin off when raw.
2. This step is optional: Mix together the roasting pastes with the soy sauce and add to the wedges. Toss to coat them in the lovely spices. The soy sauce helps spread the paste mixture.
3. Spread the wedges on a baking tin and squirt with the Frylight
4. Bake for 20-30 mins. You may find that the pumpkin cooks before the squash, so you can remove it from the trays and then return the squash to the oven for the remaining 10 minutes.
4. Leave the pumpkin and squash to cool and then peel the skins off.
5. In a pan, fry the onion and corriander stalks until soft. Add the curry paste, pumpkin and squash. Stir to combine while slightly mashing the squash/pumpkin and covering it with the curry paste. Cook for a few minutes.
6. Add the hot stock and fish sauce. Bring to the boil and then turn to a simmer.
7. Add the coconut milk and stir to combine. Taste the soup. Depending on your palete: Add paste or chilli to increase the spice level. Add fish sauce, soy sauce or salt to increase the saltiness. Add coconut milk to increase the creaminess. For me, however, the recipe above was perfect and I wouldn’t change a thing!
8. Leave to simmer for 10 minutes before serving. Top with the corriander leaf and spring onions.

Macros per serving: 180kcal (4P, 25C, 8F)

Protein Chickpea White Chocolate, Coconut and Cranberry Cake

FullSizeRender 2

I love the raspberry and coconut loaf slices that you get in some coffee shops so this bake was inspired by those. To make the sponge more exciting, I added some dried cranberries and white choc chips to the mix.

IMG_9406
The mix ready for the tin

I put the choc chips in the freezer for about an hour before adding them to the cake mix to try and slow down their melting. This worked well and you could still spot them inside the cake. I also tossed them and the cranberries in a little plain flour before adding them. As they are greasy, they easily slide to the bottom of the cake. The flour trick helps try to keep them afloat! As you can see, most did sink but at least a few remained at the top.

FullSizeRender
Cranberries flowing through the sponge

I had some Musclefood White choc and coconut prutella so thought that would make a nice addition to the filling. Alternatively, mixing some melted (then cooled) white chocolate with Philadelphia or some coconut flavoured Philadelphia would work too. I topped the cake with some local Tiptree raspberry jam as I had a little 28g pot. I then rinsed the pot with some boiling water to thin it out a little. This JUST about covers the top. You could also use some strawberry syrup or Walden Farms raspberry jam on top.

FullSizeRender 3
The whole cake

I think the whole cake itself doesn’t look as pretty as many of my other bakes, but when sliced with the fruit running through it looks really fun! The sponge was very light and tasty though and the flavours of the cranberries and choc chips running through helped make it even more delicious.

Protein Chickpea White Chocolate, Coconut and Cranberry Cake Recipe

Serves: 8 slices

Ingredients:
Cake
75g vanilla whey protein powder (coconut protein powder would be better if you have it)
40g egg white powder (I use MyProtein Egg white powder)
25g Coconut flour
A pinch of salt
1 tin chickpeas, drained, rinsed
100g 0% Greek Yogurt
4 egg whites
120ml water
1.5Tsp coconut extract
20-30 drops MyProtein White Choc FlavDrops (or other sweetener)
10 Stevia drops
15ml lemon juice
1Tbsp Baking Powder
0.5tsp (heaped) bicarb of Soda
5g plain flour
50g dried cranberries (roughly chopped to help disperse around the cake)
25g FROZEN white choc chips

Filling
70g White chocolate and coconut Prutella (As an alternative you could use some Philadelphia mixed with melted white chocolate)

Topping
28g Raspberry jam
10g dessicated coconut

Method:
1. Preheat the oven to 160C (fan assisted)
2. Mix the dry ingredients in a bowl: Coconut flour, egg white powder, protein powder
3. Blend the chickpeas with the egg whites, coconut extract and yogurt.
4. Add to a bowl with the rest of the ingredients. Use the 120ml water to rinse out the blender and then add to the rest of the mix along with the FlavDrops and Stevia drops. Mix well with a hand whisk or hand blender.
5. Add the baking powder, bicarb and lemon juice and blend a little more.
6. Finally, remove the choc chips from the freezer and toss them in the 10g plain flour along with the cranberries. As they are greasy, they often slide through the mixture and sink to the bottom of the cake. Tossing them in flour helps to stop that and by freezing the choc chips we are helping to slow down their melt.
7. Grease a cake tin and add the mixture. Bake in the centre of the oven for 25 minutes.
8. Leave the cake to cool
9. Slice the cake in half and spread a layer of Prutella through the middle.
10. Mix the jam with a splash of boiling water then brush over the top. Finally sprinkle the top with the dessicated coconut.

Macros per slice: 200kcal (18P, 20C, 5F)

Roast Pumpkin Soup

Amongst my friends I’m a little bit famous for my pumpkin soup. I make it every Autumn. This is my usual recipe that I kind of just make up as I go along. As long as there’s pumpkin, garlic, rosemary and thyme in there it’s guaranteed to be good. I like to roast the pumpkin first to soften it and bring out the lovely sweetness. I’ve made it a little early this year as my mum grew some deliciously sweet pumpkins in her garden. I used fresh thyme, rosemary and chives from my own garden too.

In the past I’ve always added a little Parmesan to it as I feel it gives a great salty, cheesy taste. In my quest to make it a little healthier I swapped it with Eat Lean protein cheese this time. It tasted great and made it nice and thick as well as improving the macros. I used a hand blender to finely chop the cheese first to help it melt quicker.

The last step for the soup making is to add something to make it creamy. You can have it without that, however, I like to add something. Ensure the soup has cooled a little first before mixing it in as you don’t want it to split. For the healthiest option, use quark. This is high in protein and doesn’t split when mixed with the soup.

Roast Pumpkin soup recipe

Serves: 5
Ingredients
1.5kg pumpkin flesh
3 garlic cloves, 8 sprigs thyme, 4 sprigs rosemary, 1Tsp sea salt – blended to make a paste
1.3L chicken stock (or veg stock)
100g Eat lean protein cheese (or 50g Parmesan)
1Tbsp finely chopped rosemary
2Tbsp finely chopped fresh chives (optional)
3 garlic cloves
150g diced onion
100g Quark (could use crime fraiche, sour cream, or cream instead)
Salt and pepper to taste

Method
1. Preheat the oven to 180C.
2. Remove the skin from the pumpkin and chop the flesh into wedges. Place in a bowl with the garlic and herb paste and about 20 squirts of fry light. Mix to coat the pumpkin wedges with the paste and then scatter pan baking tray. Roast for 20-30 mins in the oven until soft.
3. In a large pan, fry the garlic, onion and rosemary until soft and then and the pumpkin wedges. Stir to mix well and allow to cook for 5 minutes.
4. Add the chicken stock and bring to a boil. Remove from the heat and allow to cool for a couple of minutes. Blend with a hand blender until smooth. Have a taste and add salt and pepper as you see fit.
5. Stir in the cheese and place back on the heat with the lid on. Allow to simmer so that the cheese melts for about 10 minutes.
6. Remove from the heat and allow to cool for 5 mins. Stir in the quark and fresh chives.

Macros per serving: 164kcal (14P, 27C, 1.5F)

Spiced Apple & Cinnamon protein cake

I love the combination of apple and cinnamon so thought I’d adapt my cake recipe to incorporate those flavours. Instead of making an iced, round cake I opted for a square bake without any icing so that it could be served warm.

The recipe below is slightly different to what I baked because I felt that it could use some tweaks to add some extra sweetness. Even though I used 4 small apples (250g of apple when the core was removed) I felt that there wasn’t enough Apple running through it. I think this was because I used green apples which weren’t particularly sweet. So for the recipe I’m recommending that you use the sweetest apples you can get hold of (Pink ladies would be nice). I used 100g Greek yogurt like always but in the recipe I’m recommending 100g of Apple sauce instead. I think this will take the recipe to a new level and add that sweet apple goodness that I feel it needs.

Don’t get me wrong, the bake did taste good, it just needs revving up a bit! To improve the rest of my slices I will cut them in half and add a layer of apple sauce through the middle.

Unlike my other cakes, I whisked the egg whites separately and then folded them into the thick batter.

Go a little easier on the water and just use it to rinse out the blender to ensure the batter is thick enough for the apple wedges to rest on it as you layer them.

Another improvement would be to leave the top layer of apples uncovered so that they show through on the top. Tossing the top layer of apples in a mixture of cinnamon and Sukrin Gold would give a lovely finish.

Spiced Apple & Cinnamon cake recipe

Serves: 8
Ingredients:
1 tin Chickpeas in water (240g drained weight)
2Tbsp (30ml) Apple cider vinegar
40g Slender chef cinnamon syrup (or alternative)
100g Apple Sauce
40g Slender Chef Cinnamon syrup
50ml water
4 Egg whites
40g Egg white powder (I use MyProtein Egg White Powder)
25g Coconut flour
75g MyProtein Cinnamon Danish Impact Whey
1 Tbsp baking powder
0.5 tsp Bicarbonate of soda
1.5Tbsp Ground Cinnamon
1tsp Ground ginger
1tsp Ground cloves
50g raisins
Pinch of salt
20g Sukrin gold (or other sweetener)
250g apples cut into thin wedges (get very sweet, juicy apples and cut about 1cm thick)

Method:
1. Preheat the oven to 160C (fan).
2. Blend the wet ingredients until smooth: Drained chickpeas, vinegar, syrup, apple sauce
3. Mix together the dry ingredients (apart from the raisins) in a bowl: whey, coconut flour, baking powder, bicarb soda, spices, salt, sweetener
4. Add the wet ingredients to the dry and then blend with a hand blender until smooth. After blending add the raisins and mix well.
5. In another bowl, whisk the egg whites and egg white powder then fold into the cake batter.
6. You want to layer the apples and cake batter so add 1/3 of the batter to the cake tin, then a layer of apples, 1/3 batter, apples, etc. until all batter and apples are used and there is an exposed layer of apple wedges along the top.
7. Bake the cake for 25 mins.
8. Serve warm with ice cream, custard, cream, vanilla quark or Muller light banana and custard.

Macros per slice (original recipe without apple sauce): 158kcal (17P, 20C, 2F)
Macros per slice (with 100g apple sauce, as above): 166kcal (16P, 22.6C, 2F)

Banoffee Chickpea Cake


My next creation is a Banoffee Chickpea cake. As I was using a banana, I left out the usual 100g of yogurt that I usually add. You’ll notice from my photo that the topping is quite runny. I mixed the protein powder with 60ml Almond milk and then realised I’d used too much. Therefore, in this recipe I recommend using less. You need just enough for the protein powder to dissolve so that the liquid is smooth before mixing with the Philadelphia.


The cake had a great banana and caramel flavour. It was spot on. If I made it again I probably wouldn’t change anything apart from using less Almond milk for the topping.


Serves: 8 slices

Ingredients:
The Cake:
1 tin Chickpeas in water (240g drained weight)
4 Egg whites
1 very ripe banana
120ml water
60g Slender Chef Caramel syrup (Could use other sugar free syrups)
40g Egg white powder (I use MyProtein Egg White Powder)
20g Sukrin gold (or other sweetener)
25g Coconut flour
75g MyProtein Banana Flavour Whey
Pinch of salt
1.5 tsp baking powder
0.5 tsp Bicarbonate of soda
15ml lemon juice

Topping:
180g Philadelphia light
20g MyProtein Banana Flavour Whey
10-20ml Unsweetenend Almond Milk
25g Banana chips (8 whole chips, the rest crushed)
5g Chocolate sprinkles
5 drops MyProtein Toffee FlavDrops

Filling:
50g MuscleFood Salted Caramel Prutella (Or a salted caramel sauce)

Method:
1. Preheat the oven to 160C.
2. Blend all of the wet ingredients together and separately mix all dry ingredients together apart from the baking powder, bicarb and lemon juice.
3. Add the bicarb, baking powder and lemon juice and then add to the cake tin. Bake for 30 mins.
4. While baking, mix together the protein powder with the almond milk and FlavDrops then leave in the fridge to set.
5. When the cake is removed from the oven, slice in two and spread the layer of Prutella through the middle.
6. Top with the Philadelphia mix then dot the 8 banana chips evenly around the edge. Finally, sprinkle the crushed banana chips and chocolate sprinkles on top in the centre.

Macros per slice: 187kcal (20P, 18C, 4F)

Gingerbread Protein Cake

The finished cake

Another day, another chickpea protein cake experiment. 🙂 This time Gingerbread. As usual I had a Google around to see what other recipes suggested. Ground Cinnamon, Ground Ginger and Allspice seemed to be the spices. I had some Protein Dynamix Gingerbread flavour whey protein powder to hand as well so I thought this would be a nice addition. As this is quite a specific flavour, you could swap it with a Cinnamon flavour whey (MyProtein Cinnamon Danish is very tasty) or a vanilla flavour whey, but crank up the spices and other flavourings a little.

I noticed that treacle was often used so my swap for that is some Slender Chef Caramel syrup, however, you could probably use sugar free pancake syrup or a Jordan’s Skinny Syrup as a substitute there.

Next up was Stem Ginger. I found some Crystallised ginger and thought that would be a nicer addition all chopped up inside the cake. To help with the syrup part I grabbed some Ginger Preserve (jam) from Tesco and added 50g of that to the mix. If making again I’d probably omit the Ginger preserve from the cake and instead add 100g as the cake filling to make it extra sweet and delicious.

snapseed-3
Ingredients for the cake

I made a lemon-flavour topping using light soft cheese, lemon rind and lemon juice then decorated with some dried fruits. Instead of a cheese topping you could use some more of the Ginger preserve or even Orange marmalade.

img_9096
Ready for icing

Gingerbread Protein Cake Recipe

Serves: 8

Ingredients:
The Cake:
1 tin Chickpeas in water (240g drained weight)
4 Egg whites
100g Fat free greek yogurt (or quark)
120ml water
1Tbsp lemon juice (Optional)
40g Slender Chef Caramel syrup (Could use other sugar free syrups like Jordans Gingerbread Skinny syrup)
40g Egg white powder (I use MyProtein Egg White Powder)
25g Coconut flour
75g Protein Dynamix Gingerbread flavour Whey (Could used a Cinnamon version + a little extra Ground Ginger)
1Tbsp baking powder
0.5 tsp Bicarbonate of soda
1tsp Ground Cinnamon
1tsp Ground ginger
1tsp Allspice
Pinch of salt
20g Sukrin gold (or other sweetener)
50g Crystallised Ginger, chopped + 50g Ginger Preserve (Or swap for stem ginger in syrup, chopped)

Topping:
150g Lightest cream cheese (I used Waitrose Lighter soft cheese)
1Tbsp lemon zest
1Tbsp lemon juice
25g Aldi “Fruity Fiesta Pocket” (Or other dried fruit)

Filling:
50g Ginger Preserve + a splash of boiling water

Method:
1. Preheat the oven to 160C (fan).
2. Blend the wet ingredients until smooth: Drained chickpeas, egg whites, yogurt, lemon juice, water, syrup, 50g ginger preserve.
3. Mix together the dry ingredients (apart from the Crystallised/stem ginger) in a bowl: egg white powder, whey, coconut flour, baking powder, bicarb soda, spices, salt, sweetener
4. Add the wet ingredients to the dry and then blend with a hand blender until smooth.
5. Add the chopped ginger and stir well to distribute around the cake.
6. Bake the cake for 25 mins.
7. While the cake is baking, mix the cream cheese, lemon zest and lemon juice for the topping and then place in the fridge to thicken. If you want a runnier topping you can always add a splash of Almond milk.
8. When cool, slice the cake in half. Mix 50g ginger preserve with a splash of boiled water and coat one of the insides of the cake halves.
9. Assemble the cake and top with the cream cheese mixture then decorate with some dried fruit or chopped ginger.

Macros per slice: 203kcal (19P, 26C, 3F)